Category Archives: Uncategorized

Heartsaver vs BLS- Which CPR Certification Is Right for You?

CPR training is a critical skill, especially to combat any emergency or unexpected situation. With nearly 356,000 out-of-hospital cardiac arrests occurring annually in the U.S., and a staggering ~90% fatality rate, the importance of CPR cannot be overstated (Heart Association, 2023). The difference between life and death often comes down to whether bystanders are trained to act quickly.

Bystander CPR was performed in just 44.7% of out-of-hospital cardiac arrests in 2021, underscoring the need for widespread Heartsaver training (Heart Association, 2024). Whether you’re a layperson or a healthcare professional, proper CPR certification is vital. This article will compare Heartsaver vs BLS, helping you decide which CPR course best suits your needs and goals. Understanding the distinctions between these certifications could be the key to saving a life in a critical moment.

What Is Cardiopulmonary Resuscitation (CPR)?

Cardiopulmonary Resuscitation (CPR) get performed if someone’s heart stops beating or they stop breathing. It combines chest compressions alongside rescue breaths to keep up blood circulation and oxygen supply until professional medical help arrives.

CPR plays a critical role in cardiac arrest situations, as immediate action can double or even triple the chances of survival. CPR helps prevent permanent damage during those crucial minutes before advanced care is available by keeping oxygen-rich blood flowing to vital organs like the brain and heart. Both trained professionals and bystanders can perform CPR, though training improves effectiveness.

Different certification levels, such as Heartsaver vs BLS, address specific audiences. Heartsaver courses are designed for the general public, while Basic Life Support (BLS) is tailored for healthcare providers who require advanced resuscitation skills. Regardless of the training level, CPR is a vital skill that empowers individuals to act swiftly in life-threatening emergencies.

Understanding BLS (Basic Life Support)

Before diving into the details, it’s essential to recognize that Basic Life Support (BLS) builds upon CPR certification by equipping healthcare professionals with advanced lifesaving techniques, teamwork strategies, and medical equipment use- skills that go beyond the scope of Heartsaver CPR or Heartsaver First Aid training.

Definition and Purpose

Basic Life Support (BLS) is an advanced form of CPR designed for healthcare environments. Unlike general CPR certification, BLS emphasizes rapid recognition of cardiac arrest, high-quality chest compressions, and effective use of devices like bag-valve masks. It ensures providers can deliver coordinated care during emergencies, highlighting the difference between the BLS vs Heartsaver cost in training.

Target Audience

BLS is essential for medical professionals and first responders. Physicians, nurses, paramedics, emergency medical technicians, dentists, and hospital staff are typically required to hold active Basic Life Support certification. Unlike Heartsaver CPR courses for the public, BLS is mandated explicitly in healthcare settings where advanced interventions are frequently needed.

Course Content

BLS course material includes adult, child, and infant CPR techniques, plus training in two-rescuer scenarios. Participants learn to use bag-valve-mask (BVM) devices, maintain airway management, and practice effective team dynamics. Compared to Heartsaver First Aid, BLS courses offer broader, advanced skills critical for handling complex emergencies in clinical environments.

Format & Duration

A typical Basic Life Support course lasts 3-4 hours, depending on the delivery format. Options include traditional in-person classes or blended learning that combines online modules with hands-on skills assessments. This flexibility allows busy professionals to pursue CPR certification while effectively managing their demanding healthcare schedules.

Certification & Renewal

BLS certification involves written testing and hands-on skills evaluation to ensure competency. Once earned, certification is generally valid for two years. Renewal requires recertification courses to stay current with the latest guidelines. Compared to Heartsaver CPR training, BLS is more intensive but crucial for maintaining clinical readiness.

Understanding Heartsaver Courses

Unlike Basic Life Support, which is tailored for healthcare providers, the American Heart Association’s Heartsaver programs are designed for everyday people. These courses provide accessible CPR certification and first aid skills, allowing non-medical individuals to step in during emergencies, with training aligned to workplace and community needs.

Definition and Purpose

The AHA’s Heartsaver suite focuses on equipping lay rescuers with essential emergency response skills. Covering Heartsaver CPR, AED use, and Heartsaver First Aid, the courses emphasize prompt action before professional help arrives. Unlike BLS, they focus on simplified techniques suitable for non-clinical environments, often at a lower BLS vs Heartsaver cost.

Target Audience

Heartsaver courses are ideal for teachers, coaches, childcare workers, corporate staff, fitness trainers, and anyone needing CPR certification for workplace compliance or personal preparedness. Unlike Basic Life Support programs for healthcare workers, Heartsaver CPR and First Aid are tailored for individuals without medical backgrounds who still wish to respond effectively in emergencies.

Course Variants

The AHA offers several Heartsaver course options- Heartsaver CPR AED, which focuses on resuscitation and defibrillator use Heartsaver First Aid. It covers injuries, medical emergencies, and environmental concerns. On the other hand, the combined Heartsaver First Aid CPR AED provides comprehensive training. Each course offers practical, simplified approaches compared to Basic Life Support, making lifesaving skills more widely accessible.

Format & Duration

Heartsaver training is flexible and available online, in-person, or in blended formats. Depending on the course, it usually takes 2–5 hours to complete. This versatility makes it convenient for individuals and organizations, offering easier access to CPR certification than the more intensive Basic Life Support courses required in clinical practice.

Certification & Renewal

Certification is awarded after successful skills testing and/or knowledge checks, with cards valid for two years. Renewal is required to maintain an active status and align with updated AHA guidelines. Compared to Basic Life Support, Heartsaver CPR and Heartsaver First Aid certifications are less intensive, but still vital for workplace readiness.

Key Differences Between BLS and Heartsaver

While both programs provide CPR certification, the choice between Basic Life Support and Heartsaver depends on who you are and where you plan to use these skills. Understanding differences in BLS course content, Heartsaver course duration, and healthcare CPR requirements ensures you select the proper training for your professional or personal needs.

Key Differences Between BLS and Heartsaver

Audience & Use Cases

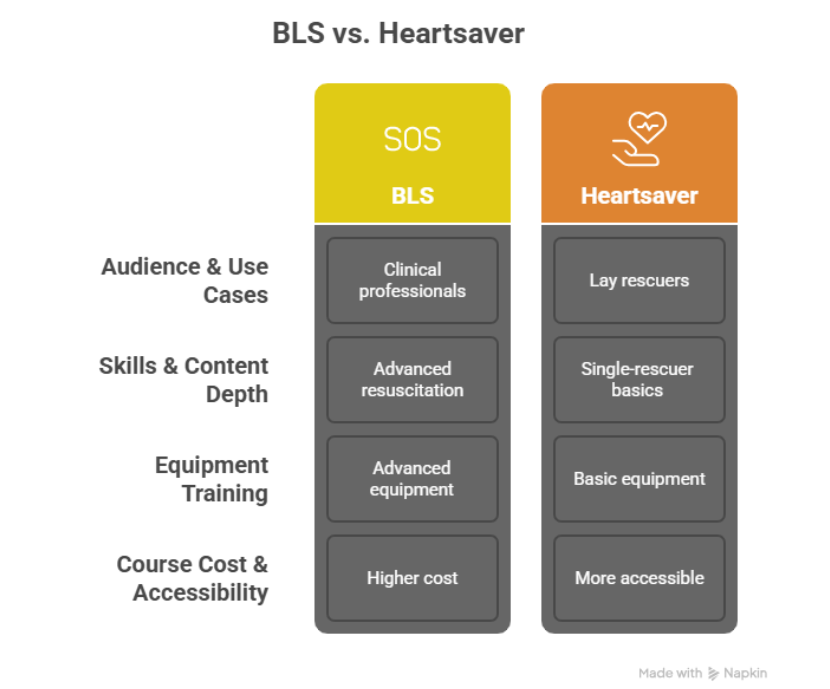
Basic Life Support is designed for medical professionals and first responders who must meet healthcare CPR requirements in hospitals, clinics, and emergency services. Heartsaver, on the other hand, targets lay rescuers such as teachers, corporate employees, coaches, or caregivers. The primary difference lies in audience and application. BLS is for clinical use, while Heartsaver for public or workplace emergencies.

Skills & Content Depth

BLS course content emphasizes advanced resuscitation skills, such as two-rescuer CPR, airway management, and team-based dynamics. It focuses on delivering high-performance CPR in complex clinical settings. Heartsaver courses, however, concentrate on single-rescuer basics—teaching how to recognize emergencies, perform chest compressions, and use an AED. The training depth differs, reflecting healthcare vs non-medical needs.

Equipment Training

BLS certification involves hands-on practice with advanced equipment such as bag-valve masks (BVMs), emphasizing airway control and coordinated team intervention. By contrast, Heartsaver primarily trains participants on barrier devices like face shields and pocket masks, combined with AED usage. These differences highlight the distinction between professional healthcare CPR requirements and community-focused readiness.

Course Cost & Accessibility

When comparing BLS vs Heartsaver cost, BLS programs are often priced slightly higher because of the advanced skills and equipment training in BLS course content. Heartsaver course duration is generally shorter, making it more accessible to the public. Both are widely available through in-person and blended options, ensuring flexibility for diverse learners.

Which Certification Should You Choose?

Selecting between Basic Life Support and Heartsaver training depends on your career path, workplace standards, and personal goals. By comparing BLS course content, Heartsaver course duration, and specific healthcare CPR requirements, you can make an informed decision that aligns with professional and personal needs.

For Healthcare Professionals

Healthcare workers such as doctors, nurses, and EMTs must complete Basic Life Support training to meet healthcare CPR requirements. The BLS course content emphasizes team-based resuscitation, bag-valve-mask usage, and advanced airway support. Since these skills are essential for hospital and clinical settings, BLS certification remains mandatory for professionals managing life-threatening emergencies daily.

For Non-Healthcare Professionals

For teachers, fitness instructors, childcare providers, or office staff, Heartsaver CPR or Heartsaver First Aid courses are typically sufficient. With a shorter Heartsaver course duration and more straightforward content than BLS, these programs focus on single-rescuer CPR, AED operation, and basic first aid. They provide accessible CPR certification tailored to non-medical roles in community or workplace settings.

For Regulatory/Job Requirements

Specific jobs require CPR certification to meet regulatory standards, such as OSHA compliance for workplace safety. Basic Life Support is the norm in healthcare due to advanced patient care responsibilities, while industries like childcare, fitness, and corporate offices often mandate Heartsaver CPR or Heartsaver First Aid. Choosing depends on the role’s legal and organizational requirements.

For Personal Preparedness

Individuals seeking to protect loved ones at home or respond to emergencies in their community benefit most from Heartsaver training. With flexible Heartsaver course duration and practical skills in CPR, AED use, and first aid, these courses equip everyday people to act confidently in crises—without the advanced focus of BLS course content needed in clinical care.

Frequently Asked Questions

What is the difference between BLS and Heartsaver?

BLS is designed for healthcare professionals, covering advanced CPR, team-based resuscitation, and equipment like bag-valve masks. Heartsaver, by contrast, is intended for lay rescuers and focuses on single-rescuer CPR, AED use, and optional first aid. The choice depends on whether clinical or community-level skills are required.

Can a BLS instructor teach Heartsaver?

Yes, an AHA-certified BLS Instructor can also teach Heartsaver courses. Since BLS is a higher credential, instructors are qualified to deliver Heartsaver CPR and First Aid programs, provided they are aligned with an authorized AHA Training Center and use the approved course materials for proper certification delivery.

Is it better to be CPR or BLS certified?

BLS certification is considered advanced CPR, and it is required for healthcare professionals due to its emphasis on team-based care and advanced techniques. Heartsaver CPR AED is sufficient for laypersons or workplace compliance. The decision depends on your profession, regulatory requirements, and whether you need healthcare-level or general community-level skills.

Is Heartsaver First Aid the same as CPR?

No, Heartsaver First Aid is different from CPR training. It addresses medical emergencies such as bleeding, burns, allergic reactions, and shock, while Heartsaver CPR AED focuses on resuscitation and defibrillator use. Learners may take them separately or combine both for a comprehensive workplace and personal preparedness course.

Trends in CPR Certification

CPR certification has evolved significantly, with blended learning becoming one of the most popular approaches. Programs like HeartCode® for BLS and Heartsaver online courses allow learners to complete theoretical components independently, followed by in-person skills sessions for hands-on practice. This model offers the best of both worlds. Flexibility and reliability are provided for busy professionals through supervised skill testing. Healthcare providers often choose HeartCode® BLS to meet rigorous requirements, while community members benefit from Heartsaver online programs for workplace or personal preparedness. Adopting blended learning reflects modern needs, ensuring broader accessibility and consistency in lifesaving education.

Finding and Registering for a Course

Choosing the right CPR certification program starts with identifying your needs for healthcare CPR requirements or community-level skills. Once decided, learners can easily register online through the American Heart Association or authorized training centers for both BLS and Heartsaver programs.

Online vs In-Person

Online CPR certification offers flexibility, self-paced study, and convenience, but requires an in-person skills test for validity. In-person training ensures immediate feedback, peer interaction, and direct practice under instructor supervision. Classroom-based BLS course content is often preferred for healthcare providers, while lay rescuers may benefit from online or blended Heartsaver course duration options.

Blended Learning Options

Blended courses combine online modules with hands-on practice, ensuring learners know theory before demonstrating skills. This approach saves time, increases accessibility, and allows participants to balance training with work or personal commitments. Both HeartCode® BLS and Heartsaver online use this model for effective certification.

Cost Comparison

BLS vs Heartsaver cost varies by location and provider. Heartsaver courses are typically less expensive, ranging from $60 to $100, while BLS courses cost slightly more due to advanced training. Despite higher fees, BLS offers greater professional value for healthcare providers, while Heartsaver provides affordable and essential certification for the general public.

Wrapping up

Choosing between Heartsaver and BLS depends on your role, responsibilities, and certification requirements. Basic Life Support (BLS) is essential for healthcare providers needing advanced resuscitation skills. At the same time, Heartsaver CPR and First Aid courses empower non-medical individuals to respond effectively in work, home, or community emergencies. Both pathways provide life-saving knowledge, but selecting the right one ensures you meet professional standards or personal preparedness goals.

Ready to earn your CPR certification? Check out flexible, accredited courses with Simple CPR today and get certified online quickly, affordably, and confidently.

Swimming Pool First Aid- Emergency Medical Response & Chemical Treatment

Swimming pool first aid is a crucial skill for the safety and well-being of swimmers. Accidents can occur anytime, and knowing how to respond effectively can make all the difference. Whether it’s a slip, a drowning incident, or an allergic reaction to pool chemicals, understanding emergency medical response and chemical treatment is essential for pool owners and lifeguards. In this article, we will learn the fundamental principles of swimming pool first aid, focusing on handling various emergencies, from physical injuries to exposure to harmful chemicals. Additionally, we will highlight the best practices for managing pool-related chemical treatments and the importance of preventative measures to reduce risks. Mastering swimming pool first aid can help save lives and ensure a safer, more enjoyable swimming experience for everyone involved.

Understanding “Swimming Pool First Aid”- Medical vs Chemical

Swimming pool first aid encompasses two vital areas: medical emergencies and chemical-related incidents. The first section focuses on physical injuries or health crises, where a well-stocked swimming pool first aid kit and knowledge of poolside emergency response are essential. Typical situations include cuts, sprains, and, most critically, drowning. In such cases, drowning CPR and immediate action are crucial to saving lives.

The second section addresses chemical emergencies due to exposure to pool cleaning agents or imbalanced water chemistry. Knowing how to handle chemical burns, irritations, or poisoning is a key aspect of swimming pool first aid. Both medical and chemical responses require preparedness, the right equipment, and a clear understanding of emergency protocols. By distinguishing these two categories, pool owners and operators can ensure they are fully equipped to handle any situation at the poolside.

Medical First Aid at the Pool

Poolside emergencies can happen unexpectedly, so it’s essential to understand how to respond to various medical situations. Prompt and effective medical care can prevent further harm and save lives. Below are the primary steps for handling common emergencies at the pool.

Emergency Response for Drowning & Near-Drowning

If a drowning or near-drowning incident occurs, call 911 immediately. Remove the victim from the water carefully, ensuring minimal movement. Begin drowning CPR with a ratio of 30 chest compressions to two rescue breaths. Keep providing CPR until professional help arrives or the person begins to breathe. Monitor vitals closely to ensure recovery.

Treating Cuts, Scrapes & Bruises

Minor injuries such as cuts, scrapes, or bruises should be cleaned first with water and mild soap to prevent infection. Apply direct pressure to stop any bleeding. Afterward, dress the wound with sterile gauze or bandages. Look for symptoms of disease, such as redness or swelling. Always have a swimming pool first aid kit ready for these injuries.

Managing Sprains, Strains & Heat Exhaustion

For sprains or strains, use the RICE method: Rest, Ice, Compression, and Elevation. Raise the injured limb to reduce swelling. For heat exhaustion, move the person to a cooler environment and encourage hydration. Get medical help if symptoms worsen or the injury involves significant pain or swelling.

Eye Injuries & Chemical Exposures

If you experience chemical exposure in the eye, flush the affected eye with clean, cool water for at least 15 minutes. If an object is embedded in the eye, do not attempt to remove it. Contact poison control and seek medical attention for chemical burns caused by enzyme-based clarifiers or other pool chemicals.

When to Call 911 or Seek Professional Help

If the injury or medical situation is severe—such as unconsciousness, heavy bleeding, difficulty breathing, or significant swelling—immediately call 911. For non-life-threatening situations like minor sprains, use sprain first aid, monitor the condition, and get professional help. Always follow Pool First Aid directions closely.

Poolside First Aid Kit Essentials

A well-stocked, waterproof, and easily accessible first aid kit is crucial for handling poolside emergencies. Regular weekly audits ensure the kit remains fully stocked and that supplies are in good condition. The right tools can make all the difference during an emergency, so ensure your swimming pool first aid kit is always ready.

Poolside First Aid Kit Essentials

Wound Care & Bandages

Your swimming pool first aid kit should contain various sizes of sterile bandages, gauze pads, and adhesive strips for cuts, scrapes, and abrasions. Use these to clean wounds and apply pressure to stop bleeding. Continuously monitor for infection and be prepared to treat more serious injuries with antiseptic solutions. If an injury is severe, follow Pool First Aid directions for further care.

Tools & Equipment

Essential tools include scissors for cutting bandages, gloves for sanitation, a CPR mask for performing drowning CPR, and a thermometer to monitor body temperature, especially if someone shows signs of heat exhaustion. These tools are necessary for performing sprain first aid or addressing other poolside injuries, ensuring you’re prepared for emergencies.

Medications & Emergency Info

Your kit should include pain relievers, antihistamines for allergic reactions (such as from eye chemical exposure), and a comprehensive emergency contact list. Ensure all medications are clearly labeled and up-to-date. Keep an emergency plan with essential health information for pool guests, such as medical conditions or allergies, to guide treatment when necessary.

Maintenance & Auditing Protocol

Regular audits ensure your poolside first aid kit remains stocked and functional. Set a weekly schedule to check for expired supplies, replace used items, and verify everything works. This includes checking items like the enzyme-based clarifier or additional medical supplies for specific poolside emergencies.

Chemical “Pool First Aid- Water Treatment

An enzyme-based clarifier is a water treatment solution that breaks down organic contaminants like oils, lotions, and debris in pool water. It helps to improve water clarity and filtration, ensuring the pool is safe and pleasant for swimmers. Understanding its purpose and proper usage is key to maintaining pool health.

How It Works & Key Benefits

An enzyme-based clarifier breaks down organic matter, such as oils, dirt, and dead algae, into smaller particles that the pool filter can remove. This improves water clarity and reduces the frequency of cleaning. It also helps prevent clogged filters and uplifts the swimming experience by maintaining clean water.

Directions for Use

The recommended dosage for the enzyme-based clarifier is 2 oz per 1,000 gallons. Distribute the clarifier evenly across the pool’s surface while the circulation system runs to ensure proper mixing. Avoid pool shock during treatment, and ensure the water temperature is within the recommended range for optimal results.

How Long to Wait Before Swimming?

After applying an enzyme-based clarifier, wait at least 30 minutes before swimming to allow the treatment to mix with the water and begin working fully. This ensures the pool is free of contaminants and safe for swimmers. Always check water clarity before allowing anyone to enter the pool.

Troubleshooting Common Issues

If the pool water remains cloudy after using an enzyme-based clarifier, it may be due to improper distribution or insufficient circulation. Double-check the dosage and ensure proper water flow. If issues persist, check for an overuse of chemicals or contamination levels beyond what the clarifier can handle.

Preventive Measures & Pool Safety Protocols

Maintaining a safe swimming environment requires regular inspections, consistent staff training drills, and meticulous record-keeping. These preventive measures ensure prompt response to emergencies and help minimize accidents at the pool. Clear safety protocols are vital for creating a safe, enjoyable experience for everyone.

Lifeguard & AED Maintenance

Ensure that lifeguards are trained in CPR and AED usage, and regularly inspect and maintain the AED units. Lifeguards should undergo regular drills to stay prepared for emergencies. Ensuring that lifesaving equipment is always functional and accessible is key to adequate poolside safety and emergency response.

Bloodborne Pathogen Cleanup Kit Guidelines

A bloodborne pathogen cleanup kit should be readily available at the pool. It must include gloves, disinfectants, biohazard bags, and other essential supplies to clean up blood or bodily fluids safely. Proper protocols for using the kit are necessary for all pool users.

Consulting with risk management professionals ensures the pool complies with safety standards and regulations. Regular reviews and consultations help minimize liability and maintain a safe environment. Stay updated on local health codes, and consider periodic inspections to ensure your pool meets or exceeds all safety and sanitation requirements.

Compliance & Risk Management Consultation

Wrapping Up

Swimming pool first aid combines medical response and chemical management, ensuring safety for swimmers and maintaining healthy pool water. From handling drowning incidents to treating cuts, sprains, or chemical exposure, preparation is key. Equally important is understanding how to use enzyme-based clarifiers properly for clean and safe water. A well-stocked poolside first aid kit, trained personnel, and strict safety protocols can make all the difference in preventing accidents and saving lives. To strengthen your skills and be fully prepared, check out Simple CPR’s certified courses—because confidence and knowledge are the best tools in any emergency.

FAQ

How soon can you swim after using Pool First Aid?

It’s recommended to wait at least one hour after applying Pool First Aid before swimming. This allows the product to circulate and start working effectively. Always ensure proper water circulation and carefully follow the manufacturer’s instructions.

What is first aid for pools?

First aid for pools has two meanings. It refers to medical first aid for handling accidents, injuries, or illnesses around pool areas. Additionally, it relates to “Pool First Aid,” an enzyme-based chemical treatment designed to break down organic contaminants and restore water clarity, keeping the pool safe and clean.

What should be in a first aid kit at a pool?

A poolside first aid kit should be waterproof and well-stocked. Essentials include adhesive bandages, gauze pads, antiseptic wipes, disposable gloves, scissors, a CPR mask, instant cold packs, pain relievers, and an emergency contact list. These supplies ensure a quick and effective response to poolside accidents or minor medical emergencies.

How long does Pool First Aid take to work?

Pool First Aid begins working immediately once added to the water, targeting and breaking down contaminants. However, noticeable results and complete water clarity usually take between 24 and 48 hours with continuous circulation. During this treatment period, avoid adding other chemicals like shock to prevent interference with effectiveness.

CPR for Pregnant Women- Step-by-Step Guide to Safe Maternal Resuscitation

Maternal cardiac arrest is a rare but life-threatening emergency that requires immediate and specialized care. The incidence is approximately 1 in every 12,000 deliveries, according to the American Heart Association (AHA). While uncommon, this statistic highlights the critical need for healthcare providers and bystanders to be prepared. The most common causes include hemorrhage, cardiovascular disease, amniotic fluid embolism, sepsis, and anesthesia complications, as identified by Jeejeebhoy et al. (2015). Recognizing these risks early can help in both prevention and prompt intervention.

Standard techniques must be adapted when performing CPR on a pregnant woman to account for physiological changes during pregnancy. These CPR modifications are essential to protecting both the mother and the fetus. Our article provides a clear, step-by-step approach to managing maternal cardiac arrest. This will help you respond effectively in this critical situation. Every second counts—being informed can save two lives.

Why Pregnancy Requires Modified CPR?

Pregnancy introduces significant physiological changes that make standard CPR less effective. To improve outcomes, specific CPR modifications are necessary when responding to a maternal cardiac arrest.

Aortocaval compression and reduced cardiac output

The enlarged uterus can compress the aorta and inferior vena cava when the woman lies flat on her back, in the advanced months of pregnancy. This is known as aortocaval compression, and it can reduce cardiac output by 30–40% during the third trimester, as per the American Heart Association (AHA). This drastic reduction impairs blood flow to both the mother and the fetus, making chest compressions less effective. To counter this, left uterine displacement (LUD)—manually or by tilting the patient 15 to 30 degrees to the left—is essential during CPR for a pregnant woman.

Time-sensitive delivery decisions

For pregnancies beyond 23–24 weeks of gestation, the AHA emphasizes that resuscitative hysterotomy (emergency C-section) within 5 minutes of arrest offers the best chance for neonatal survival. This timeline underscores the urgency of initiating advanced interventions without delay.

Understanding these physiological changes is critical for improving survival outcomes. Modifying standard CPR in pregnant women is not optional—it is vital for saving both maternal and fetal lives.

Precautions and Initial Assessment

When responding to a maternal cardiac arrest, early recognition and appropriate action are crucial. The unique pregnancy physiology—including increased blood volume, altered respiratory function, and risk of aortocaval compression—requires immediate assessment and specific precautions to optimize survival for both mother and fetus.

Check responsiveness and call for help.

Start by checking the woman’s responsiveness and breathing. If she is unresponsive and not breathing normally, call emergency services immediately. Be sure to state clearly that the patient is pregnant. This prompts dispatchers to notify the appropriate team and prepare for interventions like perimortem cesarean delivery.

Assess gestational age

Quickly assess whether the pregnancy is visibly ≥20 weeks of gestation, usually indicated by a uterus at or above the level of the umbilicus. If so, initiate left uterine displacement (LUD) to relieve aortocaval compression. This can be done manually or by placing a wedge or towel under the right hip to tilt the patient 15–30 degrees to the left.

Prepare for pregnancy-specific interventions.

Once cardiac arrest is confirmed, begin BLS in pregnancy with high-quality chest compressions and ensure airway management with minimal interruptions. Defibrillation in pregnancy should be administered as in non-pregnant patients—no modifications in energy levels are needed. However, all providers should be trained in ACLS in pregnancy, which includes early consideration of resuscitative hysterotomy if there is no return of spontaneous circulation within 4–5 minutes.

Positioning and Left Uterine Displacement (LUD)

Proper positioning during CPR for a pregnant woman is critical to prevent aortocaval compression, which can significantly reduce blood flow to vital organs and compromise resuscitation efforts. Understanding and applying left uterine displacement (LUD) can improve chest compressions and increase the chance of survival for both mother and baby.

Why is full side-lying contraindicated?

A common misconception is to place the pregnant woman in a full side-lying position to relieve aortocaval compression. However, this is not recommended during cardiac arrest. Full lateral positioning makes high-quality chest compressions nearly impossible due to instability and poor access to the chest. According to the BLS pregnancy and ACLS in pregnancy guidelines, chest compressions must be performed with the patient in a supine position while applying LUD.

How to perform left uterine displacement?

LUD can be done manually by standing on the patient’s left side and gently pushing the uterus to the left. Alternatively, place a firm wedge (such as a blanket or rolled towel) under the woman’s right hip to create a 15–30 degree tilt. The pressure on inferior vena cava and aorta get relieved, improving venous return and cardiac output.

Maintaining LUD throughout resuscitation is vital, especially when preparing for perimortem cesarean delivery. It supports circulation until either return of spontaneous circulation (ROSC) or resuscitative hysterotomy is performed. In cases of defibrillation in pregnancy, no changes in energy settings are needed, and shocks can be delivered safely with proper positioning.

Performing High-Quality Chest Compressions

Effective chest compressions are vital during pregnancy resuscitation to restore circulation. Due to changes in pregnancy physiology, such as an improved diaphragm, minor adjustments in technique are necessary.

Performing High-Quality Chest Compressions

Hand placement and compression quality

Place your hands slightly higher on the sternum than usual. This accounts for the third shift of internal organs for a pregnant woman. Compressions should be delivered at 100–120 per minute with at least 2 inches (5 cm) depth.

Adjusting for pregnancy anatomy

The growing uterus affects chest anatomy and diaphragm position. Proper hand placement helps ensure compressions generate adequate forward blood flow. Combine this with left uterine displacement to relieve aortocaval compression.

Integration with other interventions

Continue compressions while other team members prepare for airway management, defibrillation, or resuscitative hysterotomy if indicated. High-quality compressions are the foundation of all advanced measures, including targeted temperature management post-arrest.

Airway management and rescue breaths

Airway control is critical during pregnancy resuscitation, as pregnancy physiology increases oxygen demand and aspiration risk. Prompt, effective airway management supports both maternal and fetal survival.

Modified techniques for pregnant women

Use the head-tilt-chin-lift method cautiously, mindful of the increased soft tissue in the airway. If trauma is suspected, use the jaw-thrust maneuver. In maternal arrest, the risk of aspiration is high due to delayed gastric emptying and reduced esophageal tone.

Ventilation guidelines

Deliver rescue breaths with a bag-valve mask using 100% oxygen, at one breath every 6 seconds (10 breaths per minute), ensuring a visible chest rise. Avoid over-ventilation, which can decrease cardiac output. Secure the airway early with advanced techniques if trained personnel are available.

Role in overall resuscitation

Ventilation must occur with minimal interruption to compressions. Ensure left uterine displacement continues during ventilation. Efficient oxygenation reduces fetal hypoxia and supports targeted temperature management if spontaneous circulation is restored.

Defibrillation in pregnancy

Defibrillation pregnancy protocols follow the same principles as in non-pregnant patients, but must be executed without delay. Cardiac arrest rhythms such as ventricular fibrillation or pulseless ventricular tachycardia require immediate defibrillation.

Pad placement and safety

Place AED pads in the standard anterior-lateral positions. If the abdomen interferes, pads may be adjusted slightly to accommodate the body’s shape. Electrical shocks do not increase the risk to the fetus. Prioritize maternal survival, as restoring maternal circulation directly supports fetal life.

No delay in defibrillation

Do not delay defibrillation for fetal monitoring, oxygen delivery, or setup of other interventions. If a shockable rhythm is identified, deliver the shock at standard energy levels. Continue high-quality compressions and left uterine displacement immediately after each shock.

Integration with advanced care

If there’s no return of spontaneous circulation within 4–5 minutes and gestational age is ≥23–24 weeks, initiate resuscitative hysterotomy per current pregnancy resuscitation guidelines. Defibrillation should never be withheld or delayed when clinically indicated.

Quick, decisive action in defibrillation pregnancy scenarios is vital. Combined with quality CPR, airway management, and appropriate interventions, timely defibrillation can be life-saving in maternal arrest causes involving shockable rhythms.

Advanced Interventions and the 4-Minute Rule

In cases of maternal cardiac arrest, rapid escalation to advanced care is essential. The pregnant CPR protocol includes specific guidelines for timing, medication, and potential delivery decisions to maximize survival for both the mother and fetus.

Advanced Interventions and the 4-Minute Rule

IV access and medication

Establish IV access above the diaphragm, typically in the upper extremities, to ensure adequate circulation during arrest. Administer ACLS medications as outlined by the American Heart Association (AHA), following standard dosing protocols. Medications should not be withheld due to pregnancy unless contraindicated.

The 4-minute rule and resuscitative hysterotomy

If there is no return of spontaneous circulation (ROSC) within 4 minutes, and the pregnancy is ≥23–24 weeks of gestation, begin resuscitative hysterotomy immediately. The goal is to deliver the fetus within 5 minutes to improve both maternal and fetal outcomes. This emergency perimortem cesarean delivery relieves aortocaval compression and can significantly improve the chance of successful maternal resuscitation.

Post-resuscitation care

After achieving spontaneous circulation (ROSC) return in a pregnant patient, careful post-resuscitation management is essential to stabilize both mother and fetus.

Targeted temperature management and monitoring

Initiate targeted temperature management (TTM) if indicated to preserve neurological function. TTM can be safely administered in pregnancy under expert guidance. Continuous fetal monitoring should begin as soon as the mother is stabilized to assess fetal well-being. This includes monitoring fetal heart rate, variability, and potential signs of distress.

Transfer and ongoing care

Transfer the mother to a tertiary care center with obstetric, neonatal, and intensive care resources. Close collaboration between critical care, obstetrics, and neonatology teams ensures comprehensive care. Maintain airway management in pregnancy and monitor for complications like bleeding, arrhythmias, or multi-organ dysfunction.

Post-resuscitation care must follow the pregnant CPR protocol and include follow-up assessments for both maternal and fetal health. It is insufficient to achieve ROSC—ongoing management is vital for full recovery.

Training and maintaining lifesaving skills

Proper response to maternal arrest depends on routine, high-quality training. CPR for pregnant women scenarios are rare, but the consequences of unpreparedness are severe.

Regular simulation drills

Conduct regular interdisciplinary drills that simulate pregnant CPR protocol situations. Teams should practice initiating chest compressions in pregnancy, performing airway management in pregnancy, applying left uterine displacement, and conducting resuscitative hysterotomy. These realistic scenarios help refine timing, coordination, and role clarity in high-stress events.

Staying current with guidelines

Healthcare providers must stay current on evolving AHA guidelines and pregnancy resuscitation best practices. Updates in drug use, defibrillation safety, and post-resuscitation care are essential for effective response. Regular continuing education and certification in ACLS in pregnancy and BLS for pregnant patients ensure readiness.

Frequently Asked Questions (FAQ)

Which side do you lie a pregnant woman on for CPR?

You keep the pregnant woman supine for effective chest compressions, but apply Left Uterine Displacement (LUD) by tilting her 15–30° to the left using a wedge under the right hip or manual displacement. This relieves aortocaval compression and supports blood flow during CPR.

Can you use a defibrillator for a pregnant woman?

Yes, defibrillation in pregnancy is safe. Use standard AED pad placement and shock energy. Do not delay defibrillation—maternal survival is the priority, and electrical shocks pose no significant risk to the fetus. Continue high-quality compressions and left uterine displacement throughout resuscitation.

What is a consideration when performing CPR on a patient >20 weeks?

At ≥20 weeks of gestation, the gravid uterus can compress major blood vessels, impairing circulation. Apply Left Uterine Displacement immediately. If spontaneous circulation (ROSC) does not occur within 4 minutes, initiate a perimortem cesarean delivery by 5 minutes to improve maternal and fetal survival.

Can pregnant nurses do compressions?

Yes, pregnant nurses can perform CPR, including chest compressions. However, they should monitor for fatigue and rotate every 2 minutes to avoid exhaustion. If the nurse experiences pain, dizziness, or shortness of breath, they should stop immediately to protect their health and the fetus’s.

What is the protocol for CPR in pregnancy?

Follow standard BLS protocols (30:2) with key modifications- inform EMS of pregnancy, apply Left Uterine Displacement, use 100% oxygen, consider a smaller endotracheal tube, and defibrillate without delay. If no ROSC by 4 minutes and gestation is ≥23–24 weeks, begin resuscitative hysterotomy.